EQUIPMENT
Roasting Pan (or deep dish big enough for a chicken)
Baster (spoon is fine too)
Kitchen Sheers
Cutting Board
Sharp Knife
Whisk
Liquid Measuring Cup
Microplane (or other zesting tool)
BUTTER "SHMEER"
1.5 Sticks Unsalted Butter, room temperature
Zest from:*
2 Oranges
1 Lemon
2 Sprigs Dill, minced
Using a fork, mash your butter until creamy and can easily be spread about. Add in the zest and dill and mix well.

CHICKEN INGREDIENTS
Whole Chicken, trimmed of fat
2 Oranges, quartered
1 Lemon, Quartered
Salt
Pepper
2-3 Lrg. Fresh Dill Sprigs
3 Whole Garlic Cloves
1 Lrg.Onion, Quartered
Water or Broth (If using broth use a low sodium version, because you have salted the Chicken and are covering it in bacon)
4-6 Strips Bacon (depending on size of chicken)
*After you have zested all your citrus, do NOT toss them out. Quarter them and use them for the cavity of your chicken and for the pan. There is no need to waste perfectly good citrus, just because it has been zested already.
Preheat the oven to 425 degrees.
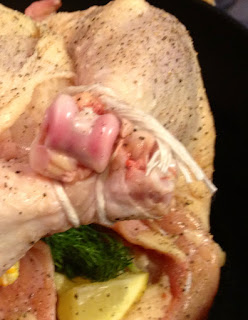
Now, the chicken! Clean it well, remove all the organs in the cavity, rinse and pat dry. Make sure the chicken is nice and dry so it will hold the butter and get a nice crispy skin, you don't want water in the cavity either.

Stick your hand under the skin to separate it from the body (do NOT take the skin off though) giving yourself "pockets" to shove the butter into...make sure you get the legs as well. Once the skin is separate continue to smear butter in between the skin and flesh. A good way to distribute it is slide a big blob under the skin then massage the top of the skin pushing the butter around beneath your hands. Generously salt and pepper the entire bird, inside and out.
Next quarter your onions, and citrus and shove half in the bird (along with the garlic cloves and dill sprigs) and reserve the other half to be placed in the bottom of the roasting pan.


In a large dutch oven (or other roasting pan of your choice)heat up some oil or bacon fat. We are going to brown the bird all over before putting it in the oven.

When your bird is nicely browned on all sides you may now add the reserved onion, orange and lemon quarters to the bottom of the pan. Along with the liquid you have chosen to use. Just about a cup and a half so things don't burn on the bottom as your beginning to cook. Lay the bacon on top of the chicken, covering as much of the bird as you can.
Put the bird in the oven and check on it after about 20-30 minutes. Because the bacon is acting as a "moisture shield" for the chicken, you do not need to baste it until close to the end. If the bacon is cooking too quickly and beginning to burn feel free to remove it and just baste the bird as needed.

After 45 minutes remove the bacon, and set aside. You will now need to baste the chicken a couple times in the 30-45 minutes of cooking. You're internal temperature of your chicken needs to reach 165 degrees. When your chicken is fully cooked remove it from the oven, and transfer to a platter or cutting board to rest for 20 minutes. Resting the chicken insures that you do not lose all those wonderful juices that have been building up...nobody likes a dry bird.
If you like you can make a gravy from the drippings, while the chicken is resting.
Remove all the large chunks and items from your roasting pan. Strain out any excess fat (you can strain this into a new pan if you think you won't be able to get all the little pieces and extra fat out) and set on the burner on medium heat.
Whisk together a mix of two parts cream (or milk) and one part flour to use as a thickener for your gravy. If you mix the flour and milk directly into the gravy without combining them first, you will have a difficult time getting out the flour lumps.
Allow the drippings to come to a simmer before adding your flour/cream mixture. Once you have added this mixture give it a nice whisk to combine then allow it to come to a simmer again until it has thickened, and any danger of "raw flour" taste is gone.
You can now slice up your bird, pour some gravy over it and enjoy with a side of you choice.
*I realized while writing this post, that I haven't given any strict directions or pictures on how to do certain things. So, I will make a point to post "how to" posts every once in a while with tips and pictures.
Comer!
No comments:
Post a Comment