Thursday, August 1, 2013

So Simple Summer Squash Pasta


You will be amazed how simple, quick and tasty this dish really is. This recipe serves 2.


EQUIPMENT
Medium Pot
Large Saute Pan
Cutting Board
Knife
Vegetable Peeler
Wooden Spoon or Spatula


INGREDIENTS
1/2 Box WW Pasta
1 1/2T. Olive Oil
2 Summer Squash, cut into ribbons (with vegetable peeler)
1 Summer Onion, thinly sliced
2-3 Cloves Garlic, thinly sliced
Salt
Pepper


Start your water to cook the pasta, follow the directions on the box for cooking time. Make sure to liberally salt your pasta water, this will help prevent the noodles from sticking as well as adding flavor to the pasta.

While the water is going, you can slice your onion, garlic and squash ribbons. Turn your saute pan to medium heat and add the oil. When the oil is warm, toss in the onions and stir occasionally until beginning to sweat then add in garlic and stir.

The water should have started boiling enough for you to add the past by now, so while the pasta is cooking we are going to move on to the squash ribbons. The onions and garlic should be soft and fragrant by now, so toss in the squash ribbons and stir gently until they are just cooked. Turn off and remove from heat. The pasta should be finished by now.

Drain the pasta and toss with squash mixture. Salt and pepper as needed. For a little extra feel free to grate some parm on top, or at the last moment toss some little cherry tomatoes into the pan until they pop then serve.

This dish is lovely with a nice red or white wine, and either by yourself on your porch while the sun sets or sitting with friends and family enjoying good conversation and laughs.


Comer!

Tuesday, July 9, 2013

Walnut Pesto

Today was my weekly 10 hour shift at the book store, and for some reason I just started thinking about pesto halfway through the day. I realized that I had no pine nuts at home, but did have walnuts. So this is pesto with walnuts....turns out its just as good. On a completely random note when did high heeled crocs become an acceptable think to make, let alone wear!!!!! What is women's fashion coming to??

EQUIPMENT
Cutting Board
Knife
Cheese Grater
Food Processor


INGREDIENTS
1/3C Walnuts
2 Garlic Cloves
2C Basil Leaves
1/2t Salt
1/4t Pepper
1/3C Olive Oil, more as needed
1/2C Parmesan Cheese

Put walnuts and garlic in the food processor and pulse until a paste is created. Add in basil leaves, salt and pepper.

While food processor is on add add in oil until smooth, add cheese and pulse till blended. Add more oil if needed.

Now you have wonderfully tasty pesto, in about 10 minutes. 

Slap some chopped tomatoes, chives and olive oil on a piece of wonderfully crusty bread and serve it along side....pour yourself a glass of full bodied red wine, grab a good book and an enjoy some time to yourself. If you're going to share it with someone please...put the phone away at least for dinner time.

Comer!


Sunday, July 7, 2013

Lime Cheesecake Bars


This is a pretty simple recipe that I just adapted from a cheesecake recipe in Fine Cooking Magazine from a 2011 issue.


EQUIPMENT:
Stand Mixer
13"x9" Baking Dish
Foil
Measuring Cups
Measuring Spoons
Microplane
Food Processor


CRUST:
2C. Graham Crackers Crumbs
3T. Sugar
7T. Unsalted Butter, Melted

Preheat oven to 375
In a food processor pulse graham crackers until nice and fine, add in sugar and pulse to mix. Drizzle in butter and pulse until incorporated.
Line baking dish with foil, allowing a bit to hang over the edges. Grease foil with nonstick spray or oil.
Evenly spread crumb mix on bottom of pan and pack down. Bake in oven for 20 minutes, until golden brown. Remove from oven and let pan rest on a wire rack to cool while you prepare the filling.

Turn oven temp down to 300.

FILLING:
2 -8oz Packages Cream Cheese, room temperature
1T. Flour
Pinch of salt
1/2C Sugar
1 1/2t. Vanilla
2T Finely grated lime zest
1T Lime juice
1t. Ground ginger
1/2t. Fresh grated nutmeg
2 Eggs, at room temperature


In your stand mixer (or bowl with hand mixer)beat the cream cheese, flour and salt on medium speed until smooth and fluffy. About 5 minutes, scraping sides of bowl frequently. When you are sure there are no lumps, add in your sugar and continue to blend until smooth. Add in vanilla, lime zest, lime juice, ginger and nutmeg and mix until blended well. Now add in the eggs one at a time. Beat until just blended, you don't want to overmix or the cheesecake will crack in the oven.
Pour the filling into the cooled and crust and smooth it out, so it evenly covers the crust. Bake at 300 degrees for 60 minutes. Let cool and cover. Can be kept in refrigerator for 3 days or in the freezer for one month.


For a little added decoration you can top with toasted coconut or even a twist of lime.


Comer!

Saturday, June 15, 2013

Quick Pickled Radishes


These are INSANELY easy! I defy anyone to find an easier pickling recipe.
I grow my own radishes, and sometimes when they're ready I'm just not in the mood to munch on them right away. So...pickling them is the obvious choice, at least to me.


EQUIPMENT
Jar with Lid
Wet Measuring Cup
Cutting Board
Knife


INGREDIENTS
2/3C. Coconut Vinegar (it's what I had, but Red Wine Vinegar is good as well)
1/2C. Sugar
2t. Coarse Salt
15 or so radishes


Thinly slice radishes and place in jar. Whisk together vinegar, sugar and salt until dissolved. Pour over radishes and screw on lid. Let sit for about 30 minutes and serve, they can be kept in the refrigerator for a day if needed.


I planted Easter Egg Radishes, but they all have come out this color so far.


Comer!

Friday, June 14, 2013

Citrus-Dill Roasted Chicken

It started pouring down rain towards the end of my work day today, and I instantly started thinking about roasted chicken with a nice gravy. Do not be daunted by roasting a chicken, it really is quit simple. This post was started several weeks ago, but I didn't have a final picture to go with it. So it sat on the back burner, I have decided to put it up though and the next time I make it I promise to add a "fully cooked bird" photo.


EQUIPMENT

Roasting Pan (or deep dish big enough for a chicken)
Baster (spoon is fine too)
Kitchen Sheers
Cutting Board
Sharp Knife
Whisk
Liquid Measuring Cup
Microplane (or other zesting tool)


BUTTER "SHMEER"

1.5 Sticks Unsalted Butter, room temperature
Zest from:*
2 Oranges
1 Lemon
2 Sprigs Dill, minced

Using a fork, mash your butter until creamy and can easily be spread about. Add in the zest and dill and mix well.


CHICKEN INGREDIENTS
Whole Chicken, trimmed of fat
2 Oranges, quartered
1 Lemon, Quartered
Salt
Pepper
2-3 Lrg. Fresh Dill Sprigs
3 Whole Garlic Cloves
1 Lrg.Onion, Quartered
Water or Broth (If using broth use a low sodium version, because you have salted the Chicken and are covering it in bacon)
4-6 Strips Bacon (depending on size of chicken)


*After you have zested all your citrus, do NOT toss them out. Quarter them and use them for the cavity of your chicken and for the pan. There is no need to waste perfectly good citrus, just because it has been zested already.

Preheat the oven to 425 degrees.

Now, the chicken! Clean it well, remove all the organs in the cavity, rinse and pat dry. Make sure the chicken is nice and dry so it will hold the butter and get a nice crispy skin, you don't want water in the cavity either.

Stick your hand under the skin to separate it from the body (do NOT take the skin off though) giving yourself "pockets" to shove the butter into...make sure you get the legs as well. Once the skin is separate continue to smear butter in between the skin and flesh. A good way to distribute it is slide a big blob under the skin then massage the top of the skin pushing the butter around beneath your hands. Generously salt and pepper the entire bird, inside and out.
Next quarter your onions, and citrus and shove half in the bird (along with the garlic cloves and dill sprigs) and reserve the other half to be placed in the bottom of the roasting pan.

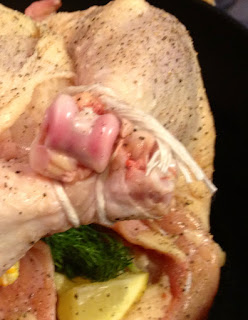
In a large dutch oven (or other roasting pan of your choice)heat up some oil or bacon fat. We are going to brown the bird all over before putting it in the oven.


When your bird is nicely browned on all sides you may now add the reserved onion, orange and lemon quarters to the bottom of the pan. Along with the liquid you have chosen to use. Just about a cup and a half so things don't burn on the bottom as your beginning to cook. Lay the bacon on top of the chicken, covering as much of the bird as you can.
Put the bird in the oven and check on it after about 20-30 minutes. Because the bacon is acting as a "moisture shield" for the chicken, you do not need to baste it until close to the end. If the bacon is cooking too quickly and beginning to burn feel free to remove it and just baste the bird as needed.


After 45 minutes remove the bacon, and set aside. You will now need to baste the chicken a couple times in the 30-45 minutes of cooking. You're internal temperature of your chicken needs to reach 165 degrees. When your chicken is fully cooked remove it from the oven, and transfer to a platter or cutting board to rest for 20 minutes. Resting the chicken insures that you do not lose all those wonderful juices that have been building up...nobody likes a dry bird.

If you like you can make a gravy from the drippings, while the chicken is resting.
Remove all the large chunks and items from your roasting pan. Strain out any excess fat (you can strain this into a new pan if you think you won't be able to get all the little pieces and extra fat out) and set on the burner on medium heat.
Whisk together a mix of two parts cream (or milk) and one part flour to use as a thickener for your gravy. If you mix the flour and milk directly into the gravy without combining them first, you will have a difficult time getting out the flour lumps.
Allow the drippings to come to a simmer before adding your flour/cream mixture. Once you have added this mixture give it a nice whisk to combine then allow it to come to a simmer again until it has thickened, and any danger of "raw flour" taste is gone.

You can now slice up your bird, pour some gravy over it and enjoy with a side of you choice.


*I realized while writing this post, that I haven't given any strict directions or pictures on how to do certain things. So, I will make a point to post "how to" posts every once in a while with tips and pictures.


Comer!

Thursday, June 6, 2013

Evil Bunnies


No doubt if I were to tell that there is a Rex Rabbit and a New Zealand White Rabbit wandering in and out of my yard, this is what you would think of. Your next thought would probably be "awwwe they're so cute and cuddly looking" NOT SO! These bunnies are pure evil!! These rabbits have driven me to fits of running around the side of my house waving my arms and screaming like a mad woman. It was apparently the "non-thought" of my neighbor that we live on a farm and it is perfectly natural to just open the cage of ones rabbits one day, and simply turn them out into the neighborhood. A small neighborhood I might add, that is a direct offshoot of the highway. Needless to say I have waged war on these bunnies


This was my morning ritual...until yesterday.


I embarked on a quest to the massive keep that is Home Depot, to acquire the necessary materials for a Hoophouse!


Which after really not as much money as I was thinking it would cost, (and only about an hour of work) resulted is this lovely enclosure for the hard work and patience that is part of my garden.

There is netting over the pipe, that you probably can't see.


Comer!

Rosemary Chops w/ Grilled Apricot Sauce & Seared Asparagus


This is one of those dinners where I had absolutely no advanced plans, and was just "flying by the seat of my pants". It came out very nicely if I do say so myself. It's a bit early for Apricots (and normally I would wait a little longer) however these smelled so tasty when I walked by them that I couldn't resist picking a couple up. All of the herbs are from my garden that has recently been plagued by evil rabbits...post about them to follow.
Anyways...I digress, as is normal for me. Without further adieu, I give you......DINNER!


EQUIPMENT
Grill Pan (you can of coarse BBQ these outside)
Tongs
Cutting Board
Sharp Knife
Immersion Blender
Small Glass Bowl


CHOP INGREDIENTS
Oil for pan
2 Pork Chops (bone in or boneless, I had boneless on hand this time)-room temperature
3-4 Sprigs Fresh Rosemary
Salt
Fresh Ground Pepper
2T. Melted Unsalted Butter
3T. Fresh Minced Chives


APRICOT SAUCE
2 Apricots, halved and pitted
1.5t Honey


Turn oiled grill pan to medium heat (this can very if you're chops are very thin, I happened to have VERY thick chops so I didn't want the outside to burn but wanted a nice "crust")
While pan is coming to temperature, generously salt and pepper your chops on both sides. When pan is warm lay down the rosemary sprigs directly on the grill pan.


Let them sit for a moment until you just begin to smell them, then place your chops directly on top.

Now, at this point I must apologize because I did not once look at the clock to see how long cooking was taking. It's a very bad habit of mine since these recipes are posted for people to make at home if they so chose. SO, since I don't time things these times will be an estimation. Pork should be cooked to 145 degrees internal temperature. Back to the recipe.
Cook the chops about 8 minutes per side. Once both sides of your chops have been cooked, flip them back over to the original side.

Melt your butter and stir in the chives. Spoon this delectable mixture on top of each chop so the flavors soak in and it just drips down onto the pan.
You may now put your apricots on the pan. By putting them on the same pan after the seasoning and flavors from the chops have begun to secrete, you are adding all these wonderful flavors to your apricots. Cook them (flipping as needed) until soft and slightly caramelized.

When chops reach an internal temperature of 145 you may remove them to a plate or cutting board and allow them to rest for about 3 minutes, before cutting into them to enjoy.
While your chops are resting, toss your apricots and honey in an immersion blender and blend until smooth. Your sauce is finished!


ASPARAGUS SIDE

1T Olive Oil
Handful of asparagus, trimmed
Salt
1T Each - Fresh Chopped Cilantro and Chives
2t Fresh Chopped Oregano

Heat your pan to medium to medium-low eat. Add in oil just as pan is coming to temperature. Toss in your asparagus and salt, stirring occasionally (so as to prevent them from burning) and cook to desired texture. When you are just about to remove your asparagus, turn off the eat and throw in all your herbs and toss a few times to evenly coat. Serve them along side your chops.


Comer!